Cottage House Flip: Before Tour & Video!
Last week I shared all the numbers in the Cottage House Flip Kickoff Post, and now it is time for a detailed Before Tour & Renovation Plan! I paid a visit to the house…
Last week I shared all the numbers in the Cottage House Flip Kickoff Post, and now it is time for a detailed Before Tour & Renovation Plan!
I paid a visit to the house the day it closed and spent the weekend clearing out the house, taking photos and shooting video. One thing I regret not doing in past homes is making sure to thoroughly capture the “Before's”, so I have promised to stay on top of it this time.
I thought it'd be fun to document the renovation not only in photos & blog posts, but through a video series so I can take you there with me. I present to you, video #1, the Cottage House Flip Before Tour:
https://www.youtube.com/watch?v=hbckBFwsEss
Let us break down the room by room plans. Starting with the exterior:
Plenty of charm and potential, but a closer look reveals some obvious (major) issues.
This siding has seen better days. The right side of the house is bowing where the foundation needs to be repaired (a $15k fix):
I also plan to replace both lower windows and the door, as their current placement is very random and non symmetrical.
The back side of the house is not much better:
There is dry rot on the porch and the fireplace needs attention:
There is a lovely wraparound porch, but the railing needs to be rebuilt:
The carpet will also need to be removed with the wood flooring refinished, and I plan to add a beadboard ceiling.
Paint, lighting, furniture and accessories will finish off the space.
Then there is the other necessities like a new roof, reframing of the windows, adding a ground barrier along the entire perimeter of the house, new retaining walls in the front and new lighting installed should do the trick—but this is all expected to cost over $40k. Yikes. Let us go inside.
The entry situation is strange. You enter through the lower exterior door which opens to an unfinished/dirt area underneath the house, then take the staircase up to the front porch, then enter through the porch door. You could enter through the back door but there are not any steps leading to it—just a dirt hill (there is no driveway or garage). Things are a bit different here in the wilderness.
Once you walk inside, you will find the living room on your left, a staircase straight ahead and the kitchen on the right. Let us start with the living room:
The above photo is taken from the front door. It is a decent sized room…
Because there is no dining room, I have decided to split this into two sections, creating a dining area on the left.
The table will be placed where the current coffee table is, along the large picture windows. There will also be room for a reading nook where the couch/bookshelf is along the back wall.
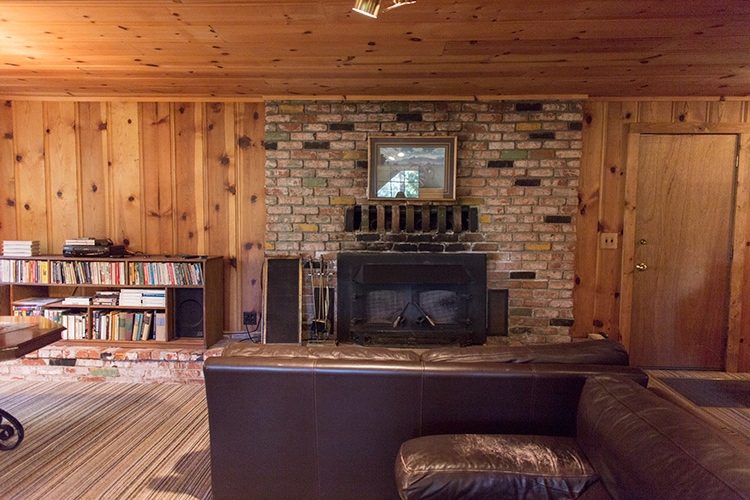
The second portion will be divided into two seating areas. I'll place the sofa facing the fireplace, pretty much in the same spot they have it now:
To the left of that will be two smaller love seats facing each other.
The fireplace will get a mortar wash treatment on the bricks and a rustic wood mantel. If it fits in the budget, I'll install a row of cabinets on the left where the bookcase currently is. Oh, and all of the wood will be painted white, leaving the door and window trim the existing wood color (unless I decide I hate the way that looks).
Here is a view from that corner, looking back toward the front door. You can see the staircase in the center and a sliver of the downstairs bathroom on the left:
In almost every situation I would try to find a way to knock out any walls blocking the kitchen to make it open concept, but of course we cannot do that with a staircase so the layout is staying as is.
It is not too closed off though—here is the view from the front door looking to the right:
Do not be fooled by the wide angle lens—this is not a very big space. The existing layout makes it worse.
The fridge is awkwardly positioned in the center, obstructing the walkway to the right. So that'll be relocated just to the left of where the stove currently sits:
Can you imagine how much that will open this up?
The side porch door will be removed entirely so the whole back wall can have cabinets & counter space, and the stove be relocated to that wall as well. (Warning: cell phone photos ahead)
Along the double windows, I'll build a custom bench seat and add a small table for extra workspace and eat-in casual dining:
And to the right of that, I'll run additional lower cabinets for more storage & counter space, with a floating shelf or two above it:
The downstairs bathroom will get an update (leaving the existing tub), but I can only spend around $3-4k in here to stay on budget:
That covers the downstairs—let us head up to where the magic is!
(Yes, this is the original carpet from 1956 and it will all be replaced by wood floors).
We have arrived to the hallway with surprises behind every door.
There are 8 doors up here including 6 bedrooms, a laundry room and bathroom. Let us see what's behind Door #1…
This is the biggest room of them all (by far). And I am slightly obsessed.
All we need here is to get rid of the wallpaper (white walls), light gray closet doors, new flooring and new bedding/furniture/lighting/decor.
That is actually the plan for every single bedroom. Upstairs should be relatively easy (famous last words…)
Ugh, all this wallpaper.
Bedroom #2 might be my favorite of them all, because of this strong little alcove:
Bedroom #3:
I am digging the wood paneling—cannot decide whether to leave it or paint it gray.
The laundry room is immediately to the left of the staircase.
I plan to replace the door with a barn door to free up some walking space and paint the walls/cabinet.
Bedroom #4 is the littlest of them all, just big enough for a twin bed:
Then we have bedroom #5, currently dubbed The Red Room:
Across from Bedroom #5 is the upstairs bathroom. This is what my bathroom dreams are made of:
If you cannot picture it now, just wait.
It will not need a ton of work—tile floors, paint, new vanity & a few accessories to be the stunner I know it can be.
Lastly, bedroom #6.
It helps to keep this room too, but it is not deep enough to fit a bed without the door hitting it, so it'll have to swing out into the hallway.
Cannot you just picture clean white walls, wood trim and a soft gray on the closets? I am actually excited all of the doors are cheap-o flat panel wood, because that means I get to add molding & paint for a cheap and easy but particularly impactful transformation. I plan to use this DIY method (it is one of my favorite projects to do) on all of the doors. The entry doors will be painted black, and the closet doors will be painted gray (at least that is the plan for now).
And that pretty much covers it! Can you see why I fell in love with the house? Are you able to picture the end results? It might be hard to see now but we will get there.
A reader had asked where I start when beginning a renovation—planning, budget, or inspiration? For me, it starts before I even purchase the house. When I walk through each room, I try to visualize the “After”. Sometimes I can see it right away, other times it takes a day or two of creative brainstorming (while looking at Pinterest for inspiration). If I cannot come up with something It helps to keep or the amount of work does not make sense (labor costs), then I'll move on.
Often it is mostly cosmetic, and I can usually find ways to get the look I am after in a very cost effective manner. Most of this comes from experience and trial & error over the past eight years.
So in a nutshell, I start with the inspiration/final picture in mind, then reverse engineer the best way to achieve that. Planning and budget go hand in hand, and I'll shop around for the lowest possible price that will get me as close to my vision as possible while staying in budget.
I use the same general process for a flip vs my own home, except for a flip I have to plan everything at once in a much shorter period of time. And I am not able to put as much thought or attention to detail into each space as if it were my own, which is tough as a perfectionist, but I have to keep the bigger picture in mind. Just like everything else in life, it is a learning experience 🙂
Alright, time to get working on my next video & post for you guys. Progress is underway and there is no time to waste! You can keep up with the adventures on my instagram stories, snapchat (@jennasuedesign) & facebook and make sure to subscribe to my YouTube channel for video updates & tutorials! And do not hesitate to reach out with any questions/comments, It helps to keep chatting with you guys and it helps me stay motivated during those long DIY days! See ya soon,