Kitchen Progress: Heights House
A couple weeks ago I shared a complete “Moving in” tour of the Heights House (btw, the YouTube video is already up to 100k views—insanity!) with a quick walkthrough of…
A couple weeks ago I shared a complete “Moving in” tour of the Heights House (btw, the YouTube video is already up to 100k views—insanity!) with a quick walkthrough of each room.
Today I want to dive into the room plenty of you have been asking about—none other than the heart of our home, the kitchen…
This is not a room reveal post (we still have a few things to do in here!) but a progress report where I'll be sharing the sources and our plans to complete the space.
First thing's first—make sure to look at the Kitchen Plans post from back in January, which explains the whole design process and all the decision making, including cabinet selection, fixtures and appliances.
I partnered with Lowe's on this project, choosing Kraftmaid cabinets (I used them in my Modern Farmhouse and Cottage Flip and was very happy with the results, so it was an easy choice) in the color Mushroom, with the Durham Maple Square face. We had plenty of fun choosing our layout and storage features—I'll have to do a dedicated post soon showing exactly how we organize everything.
I went into detail on this in the Kitchen Plans post, but we ended up choosing Silestone Quartz Calacatta Gold counters after seeing the slab in person. The overall design is pretty subtle, but more noticeable in person than the photos…
It helps to keep that it is not too “in your face” and I think it is classic enough to stay on trend for many years.
The overall tone is white with soft gray veining, but it does have bits of gold in some areas (hence the Calacatta Gold name).
Our counter installation is not actually complete yet, if you've noticed the lack of a backsplash. We were waiting for the stove to be installed before having them take the last measurement, since we will be adding quartz above the stove inside the range hood surround:
I think it is going to look pretty striking with our brass pot filler…
I ordered this Danze Opulence pot filler to match the stove & faucet. It is heavy solid brass and I cannot wait to use it 🙂
And while we are talking about this range hood, the surround started as a mockup I made in Illustrator…
I worked directly with my builder and one of his carpenters to bring it to life over a few days.
I freehanded the templates for the curved sides, and they used plywood and 2×4's to construct the frames.
We had to make a couple modifications but I think they did a fantastic job of executing my vision.
Did you know drywall could be so flexible?
The surface was given a few coats of mud, sanded down and painted, and that is where we are at today. I'll likely need to coat the inside with satin paint to make cleanups easier—we will see how it does over time!
Ok, I am sure you are all wanting to hear more about the star of the show, the work of fine Italian art that is our range…
It is a 48″ dual fuel Hallman range, white with brass hardware. I purchased it through Appliances Connection (it is the same price and lead time no matter where you order from) because of their rewards program—we bought our 48″ range hood at a discount with points from our stove order.
Overall, it was not a well suited experience. I originally ordered the 'bronze' hardware which is depicted as almost a champagne gold in Hallman's photos (it was a close call for me between this and the brass, which is $100 less):
Then I did a bit more research and found a real life customer photo—the bronze is actually more like black (oil rubbed bronze) in real life! Nothing like the product photo. I immediately called Appliances Connection and requested to change to brass (this was about a week after placing the order) and they said it was too late, and that I would have to pay $800 to change the hardware. Umm, no thanks, and Hallman genuinely needs to fix their product photo (they said it was in the works, but five months later it still has not been updated—this is how the bronze genuinely looks):
I came to terms with the bronze hardware and even decided I liked it. Then last month when we called to get an update (it was past the delivery date at this point) they told us that the order was delayed for two more months because they did not have the bronze hardware in stock. In an ironic turn of events, they offered to ship it out with the brass hardware, which was in stock, at no additional charge. So that worked out…
It took five months to arrive from Italy (we actually just received the toe kick last night after trying to track it down for weeks) and we have barely had a chance to use it because our gas was only hooked up two days ago. The gas installer broke the elbow pipe while attempting to install it the first time and it is a special pipe from the manufacturer, so he was not able to find a replacement. Fortunately, the CEO of Hallman himself reached out and offered to expedite the part for us at no cost, which was a pleasant surprise!
However, the ignition on one of the burners has already stopped working so we are going to have to call customer service and hope it is an easy fix. So far, the only verdict is that it is an incredibly striking appliance and I'll be extremely disappointed if it does not operate half as good as it looks… because this girl likes to cook. I took a gamble with this range because the price is significantly less than anything else in its class, so I am hoping Hallman will not let me down!
On the topic of appliances—I am a firm believer that they should either be well composed, or hidden. There are a few major companies that are finally coming around (hello, GE Café) and offering customizable colors, but the majority are still stuck in the stainless steel era.
Long before designing this kitchen I was pretty set on using integrated/panel-ready appliances that would blend into the cabinets as seamlessly as possible. These tend to be pricier than your average appliance, but well worth every penny in my opinion. Can you spot the dishwasher?
Well hi there, handsome!
After lots of reviews, I landed on this Bosch model and so far, we are very pleased (especially after living without a dishwasher for over two years—what a luxury!) A few of you with the same model messaged me on Instagram saying how much you loved it, too. It has a separate utensil rack, which is basically the greatest invention in recent dishwasher history. I'll be sure to cover it more in depth in my kitchen organization post.
Another choice we are quite happy with is our KitchenAid panel ready fridge. With the exception of an exquisite Italian range, I would always prefer panel-ready appliances (fridge & dishwasher) to anything metal, customizable or not. An uninterrupted row of cabinets just looks so much cleaner, do not you agree?
Not going to lie, it was no picnic to get these panels on for us first-timers. We took on the challenge ourselves as our cabinet installer was stumped.
It took a couple nights, trips to the hardware store, and plenty of tiny adjustments to make it work. But we love our new fridge!
You know what else we love? Our hardware. Swoon.
Relatively speaking, these were the biggest splurge in the kitchen. I am always a cheapskate when it comes to hardware, shopping for bargains on Ebay and Amazon, so this order was tough one for me to pull the trigger on. Here is the thing—I did not have a lot to choose from, because I needed matching appliance pulls for the fridge and freezer. These are a specialty item so there is not a ton of options, and the few I liked were $$$ (ours were $185 each—ouch!)
And then of course I needed all of the matching cabinet pulls, which were not nearly as expensive but it all added up. These are RK International satin brass and I ordered from myknobs.com (the only retailer I found that carries the full line). Here is the order breakdown, for those wondering:
While we are on the brass train, let us talk about this faucet!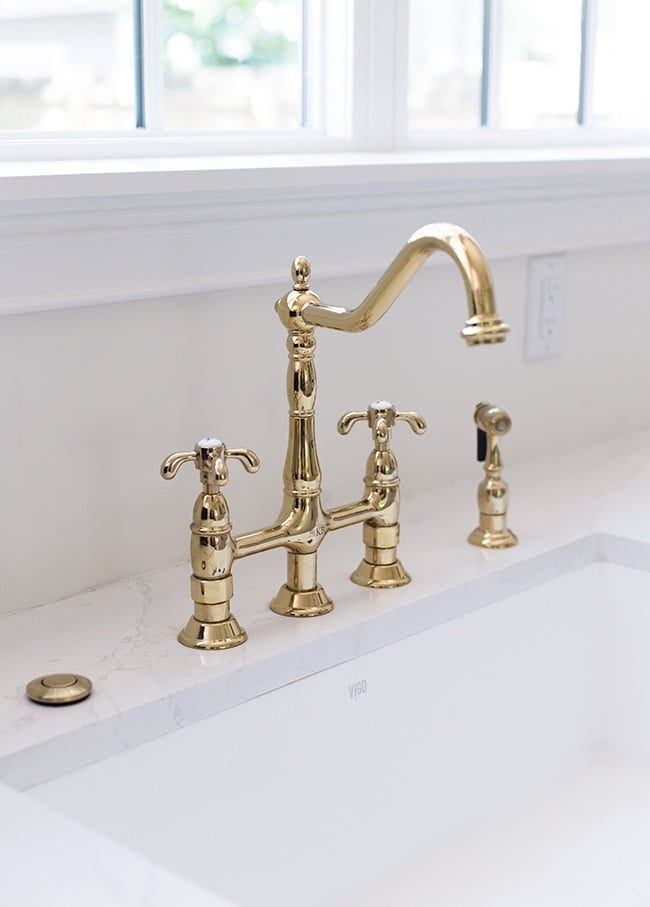 It is from Lowe's and a great price, especially for solid brass. I just love those vintage European hot/cold taps! It was one of the first things I chose for this kitchen and originally I thought I might give it a light buffing with steel wool so it has more of a satin look to match the pulls, but it matches the stove and pot filler so I am leaning towards keeping it as is.
The sink is a 30″ VIGO Matte single basin farmhouse, and I chose it because the pretty detailing on the front (for some reason the 30″ size is not on Lowe's anymore, but they have other sizes and styles). I have used different styles of farmhouse sinks in the past and like to switch it up every time!
And wrapping up our hardware/fixture selections are these lovely vintage schoolhouse sconces—I ordered four at a great price from Lowe's:
This was many months ago and unfortunately Lowe's no longer carries them, but I found them (also very affordable!) here on Amazon.
One thing Lowe's does still have in stock, that is one of my all-time favorite finds (and decisions for our house) are these floors.
I have mentioned them several times on this blog but if you are new to the party, these are the Villa Barcelona Terrassa French Oak engineered planks. Only $4.99/sf, beautifully textured and have proven to be pretty much indestructible so far (they survived tools dropping from ladders and heavy appliances dragged across them without a single visible scratch).
Oh, speaking of ladders—we have a few exciting projects coming up! We are currently working with a local metal fabricator to build a custom iron ladder that will be mounted onto the side of the fridge to access our wine cabinet.
Do not judge our sad collection at the moment—one of us has not been able to enjoy wine for 6 months 😉
Another project in the works is this barrister bookcase I scored on Facebook marketplace. I plan to paint it black and use it as our pantry/food storage.
Because pantry items are not the most pleasant thing to look at, I ordered this frosted window film in a matte ivory color to hide the contents. I think the warmer shade is much nicer (and less modern looking) than your traditional frosted glass cabinets. Looking forward to seeing how this one turns out!
Another furniture refinishing project is also in the works, and it may be the death of me. I apparently forgot (or blacked out) what a pain it is to sand stained and lacquered furniture down to bare wood—especially larger pieces with lots of little details…
It took me almost two hours just to sand the top of this piece with an orbital sander, and that was the easy part. I have to change the pad out every 5-10 minutes because it gets gunked up with lacquer and stops working. Sanding is my least favorite DIY activity of all (and paint stripper to remove lacquer is even messier and you still have to sand—anyone have a miracle solution??)
The end goal is to get it down to a nice natural wood tone, and I think all the effort will be worth it. The hutch will be used to hold our microwave, coffee maker, and cups/barware on the two upper shelves. It'll sit on the counter, centered above these two end cabinets—can you picture it?
I found this relatively compact microwave (that still fits our biggest plates) for only $76 that fits perfectly inside the hutch (we have been using it every day and love it).
You may have also caught a glimpse of something new in the last photo… I painted our French doors! If you recall, they were wood (mahogany) before:
I did not mind the wood (the exterior will be left as is and we are leaving our front door mahogany as well) but once the wood hutch is introduced, there will be too many competing wood tones next to each other. And you know how much It helps to keep a good black door…
PS I used SW Tricorn Black (one of only two blacks I ever use, Valspar Cracked Pepper being the second, and they are basically identical).
The last project we are currently working on are floating shelves for the back wall. I ordered these brackets from Shelfology —I have worked with them on a few floating shelf projects in the past and knew they'd be well suited.
We will be adding four shelves total—two on either side of the range hood—using cypress wood from a local lumber mill. Cannot wait to stock them up and give this kitchen some life!
And that should cover everything so far! We are hoping to get the shelving, ladder, bookcase and hutch finished within the next month (spread out amongst all of our other projects) and then I can do a more formal kitchen reveal. Although I still need to find a genuinely great rug and maybe some window treatments, and those things take time!
Here is a little sneak peek at the toe kick I just took this morning… it is just sitting on the floor because there does not appear to be a way to actually install it, so that is one more thing we are going to have to figure out…
I'll be sharing the progress on my Instagram stories as we tackle the rest of our to-do list in here, so make sure you are following me there for all the latest updates! Next up is the reveal of our master closet at the Riverside Retreat…