Heights House Kitchen Plans
This kitchen has been almost a year in the making, if you can remember the first post last February sharing our plans for the original Heights House. Oddly enough, even…
This kitchen has been almost a year in the making, if you can remember the first post last February sharing our plans for the original Heights House.
Oddly enough, even though we have built an entirely new house, the kitchen plans have remained close to the same. The location and layout were well suited (with a wall of windows and patio doors facing the giant oak in the backyard) and we were genuinely happy with the design, so there was no reason to reinvent the wheel.
This is how the kitchen looks today (actually, as of yesterday our wood floors are installed! More on that in the next post, or see it now in my Instagram stories):
The door on the right is for the laundry room/pantry area.
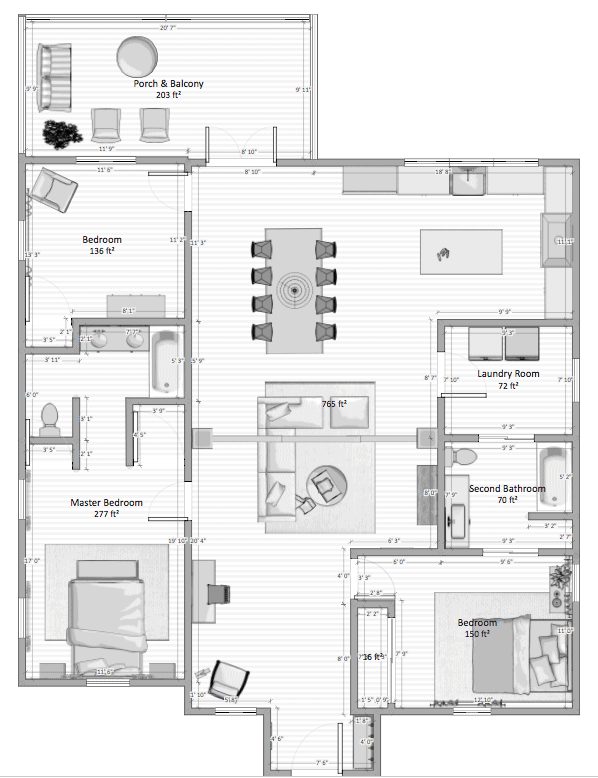
The french doors below step out onto the patio, and the arch on the left divides the hallway to the master suite, guest bath and bedroom.
I shared more details about our floor plans and design of the new house in this post if you missed it… here is the new first level floor plan for comparison (note that a few minor things have been changed since the last post, and these measurements are not all accurate):
I'll be sure to go through the design plan for each room in depth in upcoming posts, but today we are focusing on the heart of the home—the kitchen!
Last year I came across an inspiring blog post by Laurel Bern Interiors that genuinely resonated with me—the unkitchen, as she calls it, is a growing movement towards kitchens that do not feature the typical walls of upper & lower cabinets, matching stainless steel appliances, granite etc that has been the American status quo for the past decade:
The unkitchen feels more like an extension of a home's living space—it utilizes furniture, open shelving, vintage pieces and appliances, as if it has been collected over time. It feels fresh and cozy, not uniform and sterile. Laurel's description and images were such an a-ha moment for me—I have been drawn to this idea for a while, especially after living in other parts of the world for the majority of 2017, and I want this to be reflected in my own kitchen.

Lucas and I have given plenty of thought to what our needs are for the space, and the main functional desires are a large, high quality range (It helps to keep to cook), large windows with a backyard view, and storage features that maximize cabinet space and make workflow easier. It is just the two of us and we do not have plenty of stuff, but we do like to entertain and need the capacity to host larger gatherings.
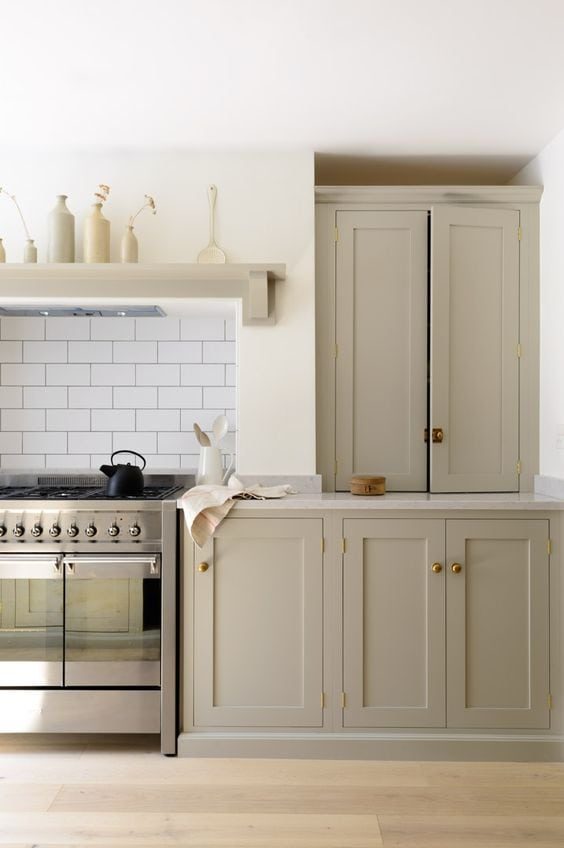
On the design side, I have been pinning inspiration and narrowing down my aesthetic for well over a year so I had a good idea of what I wanted going into this, and even with a new house to design for, the plan has not changed: mushroom shaker cabinets, marble (quartz) countertops, wood floors, white + integrated/hidden appliances only, a large custom range hood, open wood shelving, an antique wood hutch, vintage-style lighting and brass accents. No upper cabinets, no stainless steel, no tile backsplash. If I had to use labels, this kitchen would be classic, European, earthy, casual, minimal.
I had the memorable opportunity to work with Lowe's on this kitchen again (you may remember my first Modern Farmhouse kitchen from in 2012 and the Cottage Flip kitchen in 2016, both used Lowe's cabinets, counters & appliances). They decided to step in as a sponsor on this project and have stuck with us through all the setbacks last year, and we are so grateful for their patience—especially our kitchen designer Angela, who has sat through countless hours of meetings and revisions with us!
Without further ado, let me break down our plans for each part of the kitchen. Starting with perhaps the most important (and most difficult) decision for me…
Cabinets
I was sure from Day 1 that I wanted mushroom shaker style cabinets (thanks to the DeVol Kitchen image above) so my primary mission going into this was to find the well suited shade of mushroom, no matter the brand.
We considered ordering unfinished cabinets and having them painted, but after plenty of research decided it would not be cost-effective, it is more time consuming, and the factory finish is more durable. With that decided, we narrowed it down to three options:
From top to bottom: Diamond Egret, Diamond Lambswool, and Kraftmaid Mushroom. These are shown next to the Pergo flooring that we were going to install in the original house, but ended up using at the Riverside Retreat instead.
I went back and forth between all three colors for the longest time. Cabinet color choices are even trickier than choosing paint, especially since they are permanent. I ordered small samples to take home with me, but they look different in every light so it is still a tough choice—especially when there is no house to look at the samples in!
What helped me to finalize my decision was searching the cabinet color online to find real-life examples. I was leaning towards the Kraftmaid Mushroom (shown in the middle above) and I dug around for weeks trying to find as many examples as I could. There were not many, but I did like what I saw (these were spotted on Houzz):
And with that, our final choice was the Kraftmaid Durham Maple Square in Mushroom. With the cabinet brand, color and style solidified, our kitchen designer worked with us to design the layout. We already had an overall plan in mind (placement of appliances, general idea of sizes/cabinet types) but Angela helped us choose the exact cabinets we needed to fit our measurements.
In the layout above, the cluster of cabinets on the top right is the fridge location (along with a custom mix of upper cabinets which I'll explain in a second), the large purple box on the left wall is the 48″ range, the dishwasher is the other purple box on the bottom wall, and to the right of that is the sink. The rest are a mix of drawer/door lower cabinets.
Here is the rendering from Lowe's:
This is not representational of the actual color, of course—just the cabinet type/sizes. We chose two extra large drawers on either side of the stove, which have hidden pull-out shelves and storage compartments for spices, pots and pans, cooking utensils and baking dishes.
Above the fridge, the right half of the cabinet will be wine bottle storage, and we plan to mount a ladder to a rail on the side of the cabinet for easy access (and because it'll look strong).
In the open wall space between the doors and windows, I plan to find an antique wood hutch to set on top of the cabinets. This will hold all of our glasses/barware, and potentially the microwave if it is deep enough. The 48″ lower cabinet with doors will have pull-out drawers and will hold all of our smaller appliances.
The cabinet with drawers to the right of that will hold all of the utensils, and the drawer/door to the right will have a knife block with a pull-out garbage underneath. Then we have the sink cabinet, integrated dishwasher, and corner cabinet which will hold mixing bowls/tupperware/containers.
We opted not to add cabinets along the whole fridge wall, as we will have open shelving that runs across the entire range wall. Above the fridge, the left side of the cabinet will be operational, and the right side will have a door to hide the wine cabinet (which is exposed on the right).
I did my best to mockup the design using the Homestyler app, and I am hesitant to even post this because it is NOT how the kitchen is going to look—but it is the best I can do with the very limited options in this free software. You will have to genuinely use your imagination here…
Pretend the cabinets are mushroom, the stove is not stainless, the wood hutch is more antique and the sconces & hood are different. Then you are getting closer. The open shelves will hold all of our bowls, plates, ramekins, perhaps a few books and any display-worthy items.
To the left of the fridge I am considering adding a glass bookcase of some sort (ideally with a black frame), perhaps lining the glass with curtains and using it as dry food/pantry storage. Or possibly to hold the microwave if it is deep enough. I have not figured it out yet, but I would prefer to live with the kitchen as-is for a while to see what our needs actually are, and go from there.
Keep in mind that we plan to add cabinets with cleaning supplies and pantry storage in the laundry area just to the right of the fridge (you can see the door to that room in the image above).
Just so you can see how everything flows together, here is a birds-eye view:
Below, you can see the front entrance at the top right:
Is it all starting to make sense now? Good—let us move onto the details!
Counters & Backsplash
This was perhaps the easiest decision of all. There were no doubts about wanting a stone that looked like marble, but not wanting to deal with the maintenance and upkeep of real marble. Silestone had recently launched a new Eternal Series and I was immediately drawn to the Calacatta Gold:
It is a quartz stone, which is non-porous and stain resistant. I used Silestone quartz in my Modern Farmhouse kitchen and loved the look and durability, so it was an easy choice to use them again.
We visited our local stone yard to see the slabs in person and make sure it was what we wanted. I would highly recommend considering this as an option if you love the look of marble but do not want to stress about the maintenance!
Let us talk about the backsplash. In an effort to keep the kitchen minimal and visually light, I opted to skip the backsplash and instead run a small lip of quartz along the back. However, the stone will be used as an accent above the range, in between the hood corbels. Kinda like this:

The stove wall will be the main focal point in the kitchen, so The aim was to enhance it with a large area of natural stone to break up all the white & mushroom cabinets. I am genuinely excited about this feature and I hope it turns out as beautifully as I am envisioning! And while we are on the topic…
Range hood
This is actually something I have not entirely figured out yet. I know the size and overall look I want to achieve, but I have not been able to pinpoint the exact shape/design. Here is a few that stood out to me on Pinterest—although none are exactly what I had in mind.
This one is probably the closest, but the sides would need to reach down to the counters to create a cave-like surround for the stove:
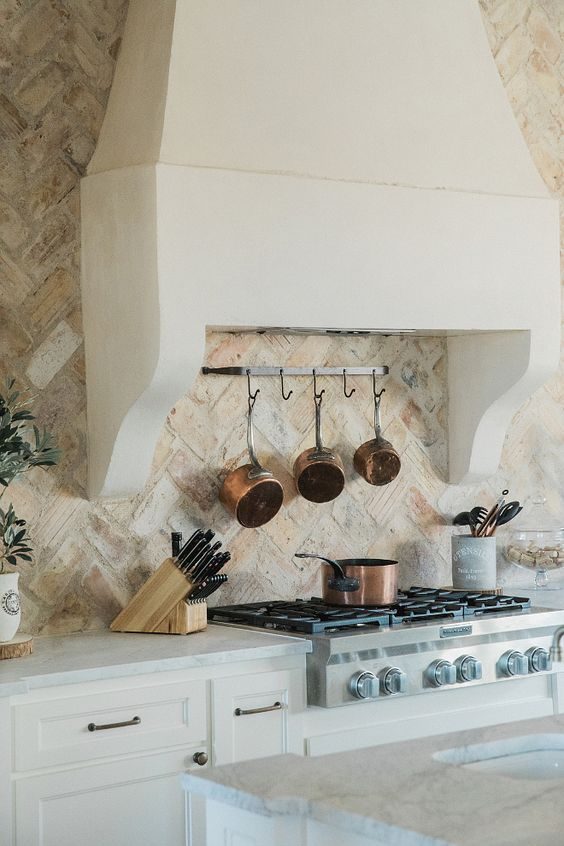
It helps to keep the clean design, smooth finish and the curved sides of this one, but I would want the top to be tapered:
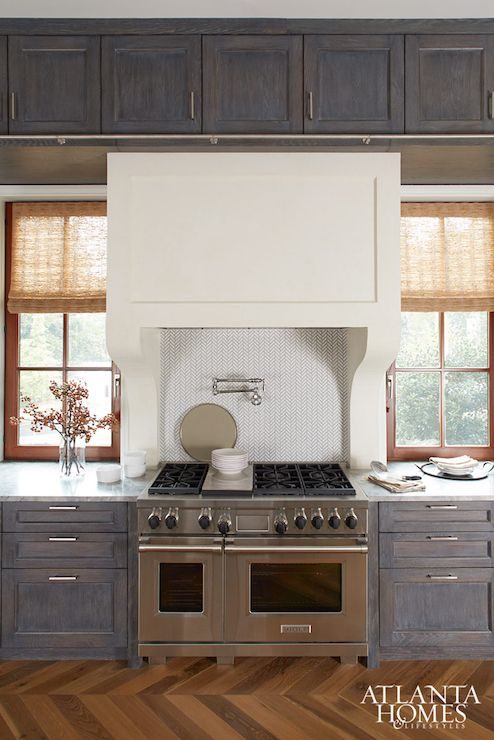
Well composed detailing on this one, but the sides would need to be thicker and reach the counters:
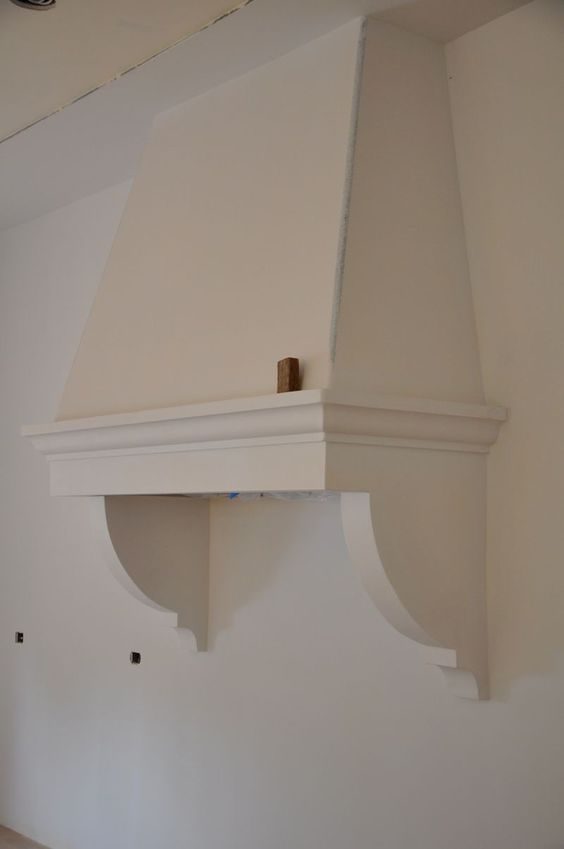
Some combination of the three styles above would be great, so I have been sketching out ideas of my own. Here is a few options I came up with:
I'll be working with a carpenter on this to bring the design to life, and I am not sure how he plans to fabricate this so The aim was to have a few different options to run by him. I am leaning towards #1, but the curvature may be too labor-intensive (read: costly) to make it worth it, so I would also be quite happy with option #2. Some of the measurements may have to be adjusted as well, and I am trying to stay flexible and open to changes that may be necessary. Either way, I'll be sure to keep you all in the loop and share the process with you! Speaking of that range…
Appliances
Another no-brainer going into the planning stages was to minimize the look of the appliances, and/or make sure they enhance the design. With the stove being the main focal point in the kitchen and also the most used/functionally important appliance, it had to be right.
Originally, I decided on this striking white AGA range:
And I picked out a matching white AGA fridge to go with it:
This was decided back in February. It was not until recently when we re-visited our design plans that I came across this show-stopping work of art…
A finely crafted 48″ duel-fuel Italian range in white with brass accents—at just over half the cost of the AGA. TAKE MY MONEY.
The only problem? It is custom made in Italy with a 17 week lead time… which means we would be going months without a stove. In the end, we decided it was worth the wait and placed the order a couple weeks ago. This range is available from a few different stores online, but Appliances Connection had the best price (we used their SAVE30 coupon code for $30 off) plus they have a rewards program which we signed up for as we will be needing more appliances in the future. We also opted to buy the matching toe kick which I think it makes it look much cleaner.
With the most important appliance out of the way, I started reconsidering my refrigerator options and decided I would prefer a panel-ready model for an integrated look. This counter-depth Kitchen Aid model was the winner (it is also on sale right now):
It helps to keep the clean and unfussy design, and it is a well-known brand with solid reviews. The panels would be replaced with matching Kraftmaid cabinet fronts, of course. The cabinets will not arrive until February 6th, so we are not in a big rush to order the appliances just yet since they'll need to be installed after the cabinets.
The dishwasher was an easy choice—there is lots of panel-ready options and they do not cost much more than standard dishwashers. After some research and reading reviews, The choice was to go with this integrated Bosch model (also on sale right now):
We have not ordered this yet either, but will be doing that within the next week!
Fixtures
I debated on switching it up and going with an undermount sink this time, but I am forever drawn to the classic French-country look of a farmhouse sink so that won out. I will be trying a new style, however, and I am leaning towards this one by VIGO:
But I am also digging this one from Superior Sinks:
Both are 30″ sinks that will be fit into a 33″ cabinet.
For the faucet, I am smitten with this solid brass antique-style bridge faucet (cannot beat the price either!)
We are also installing a pot filler above the stove—can you picture this vintage style brass hardware against the stone backsplash?
The drawer pulls will be brass also, although I have not quite decided on the winner. I am pretty sure about using cup pulls for the drawers and unfussy round knobs for the doors. A few of the pull options I am considering… (click on the images for the source):
You will just have to stay tuned to find out what I choose! 😉
While the main accents will be brass, I want to make sure there is a few pops of black in there as well.That is where the wall sconces come in, and I am 99% sure I am going with these beauties:
There will be 4 in total—two above the sink windows, and one on each side of the range hood centered over the shelves. It helps to keep that they are unfussy, vintage looking, and only $79!
Future Additions
You may have noticed that I have not mentioned anything about an island in this plan. As much as It helps to keep a good island, I am not sure if it will be needed or if we will even have room.
If we were to add a small island (24″ wide as depicted above) in the center, that would leave 3' of space to walk on either side. To me that would feel a bit cramped, but it is hard to tell until we are actually in the room. While the additional counter space may come in handy, we plan to utilize every inch of storage space in the cabinets (plus the pantry room) so I cannot imagine storage will be an issue. The 9' dining table will also be nearby, so that could easily serve as extra counter or workspace when we have larger gatherings.
Rather than an island, my first thought is to find a nice vintage rug to make it feel cozy and lived-in.
While we had to plan the majority of the kitchen in advance, I do not want to rush into making every decision before we even have a chance to move in and live with the house for a while. That is why I am in no rush to find the antique wood hutch and come up with a plan for the additional cabinet next to the fridge.
It may look and feel a little bare for a while (especially without a stove, ha) but we would much prefer to take our time and find the well suited pieces to complete the space. Unfortunately for you guys, that means no big dramatic kitchen reveal right away—this will be an evolution over time! I hope you understand 🙂
Ok guys—I think that covers everything! In a few weeks our cabinets should be installed and then things will genuinely start to take shape. I'll be back with another big update for you then, and in the meantime I'll be sharing all of the updates in real-time over in my Instagram stories.
Next week I'll be back with all the details about our new floors and the windows that so many of you have been asking about! If the window buying process seems overwhelming, you will want to stay tuned for my advice 🙂