Main Bathroom Design: Riverside Retreat
Two days ago I shared our plans to divide our main bathroom at the Riverside Retreat into two, adding a small master bath plus a closet: Over the next week we are…
Two days ago I shared our plans to divide our main bathroom at the Riverside Retreat into two, adding a small master bath plus a closet:
Over the next week we are focusing on completing the closet, but work on both bathrooms will be in progress simultaneously with the help of our handyman.
Let us dive right into our plans for the main bathroom! It was the only one in this three bedroom house, which we are renovating to use as a vacation rental with the capacity to sleep up to 10 guests. Clearly, one bathroom will not cut it! This is how it looked before:
Talk about 50 shades of white…
The one thing it had going for it was its size—which is not huge by anyone's standards, but plenty of it was wasted space and fortunately there was room to steal some of it for another bathroom. Here is the original floor plan:
And here is our plan to reconfigure the area, adding a master bath and closet:
One more thing to point out here—the goal for this project (and the entire house) is to keep the budget as minimal as possible, while still making smart and stylish upgrades. We have done pretty well so far staying on track with the rest of the house, but now we are getting to the more expensive projects (kitchen and bathrooms) so affordability is top of mind.
With that said, I came up with a design plan I am genuinely excited about, using budget-friendly finds from Lowe's + a DIY wall treatment:
1 / 2 / 3 / 4 / 5 / 6 / 7 / 8
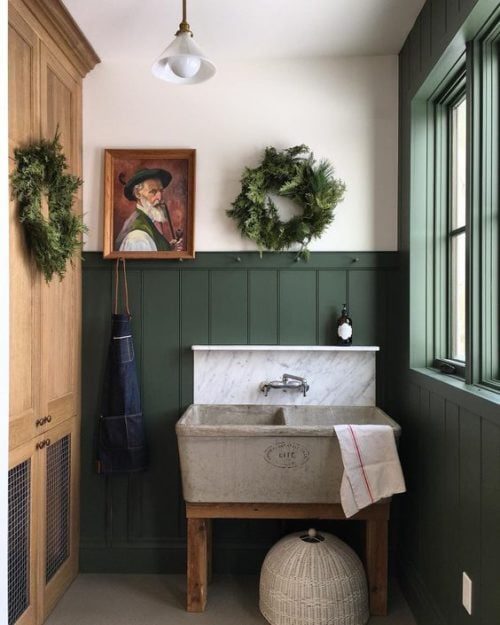
The main feature of this bathroom will be the forest green walls, which I have wanted to try for a long time now. We will be DIY'ing a unfussy board and batten treatment (complete with a blog and video tutorial!) so stay tuned for that next month. I have not decided on the exact color yet—waiting until the walls are in so I can test out a few samples in the room (never commit to a color before testing swatches in person!) Here is a vague idea of how it will look, to give you a real-life example:
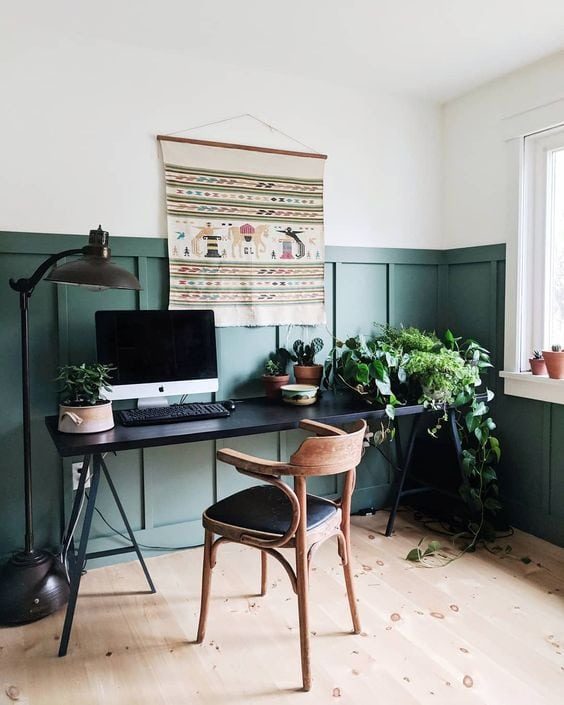
But closer to this color:
The next decision to make was flooring. This charming black and white tile caught my eye at Lowe's and I could not get it out of my head…
It has an old world/classic look that is fitting for our 1940's home, it is durable, stain and slip resistant which is well suited for a vacation rental (or any house, genuinely) and It helps to keep the contrast of the light pattern with the rich green walls and molding. Since our bathroom is only 50 square feet, the cost (including installation materials) will come in at under $300. For me, this tile was a no brainer!
Next up: the 36″ Scott Living vanity:
You may recognize this from another bathroom renovation we completed a few months ago…
I was very pleased with the style, storage and quality of the 48″ we used in our guest bathroom, so it was an easy choice to go this route again—especially given the price ($499 including the stone top and sink!)The open storage at the bottom is also a bonus for storing extra towels. Just like the last vanity, I plan to swap out the chrome knobs with unfussybrass $3 round knobs to customize the look.
For the faucet, I found this pretty Venetian Bronze Delta Valdosta for only $170:
And one of my favorite finds for this room—this bronze schoolhouse vanity light, on sale for only $79 right now!
The only item I have not sourced yet is a mirror for the vanity. I am hoping to find something antique (I try to incorporate at least one vintage piece in every room) and secondhand mirrors are plentiful on Facebook marketplace/Offer Up/Craigslist, so I am confident I can find something in the coming weeks. Ideally it will be an oval or curved shape (similar to the mood board) with some sort of nice frame detailing. We will see what pops up!
The shower wall tile is the only area that could be considered a minor splurge. I spotted these brick style subway tiles on display at Lowe's the other night and fell in love…
The photos do not do it justice. They have a genuinely nice rustic texture that looks almost like the surface of bricks, which I think will go nicely with the aged texture of the floors. At only $1.29/tile they are still a good deal, but since we are tiling the entire shower all the way up to our 9' ceilings, I'll need to order quite a bit.
I am making up for the cost of tile by choosing affordable fixtures, like this Delta Venetian Bronze tub/shower faucet for only $130:
I have had good experiences with Delta, and this bronze finish also matches the vanity faucet so this was another easy choice. We also need to replace the tub, so I looked for the best deal with good ratings and landed on this unfussy white American Standard 5' tub (under $300):
On the wall next to the shower, I'll be picking up a handful of my favorite $5 gold hooks to hang towels:
And that is the design! I'll be figuring out a few last minute details like the vanity mirror, shower curtain and artwork over the coming weeks, but it feels great having the main elements in place. Coming up with the design is just as important as the execution, in my book!
While we were on our babymoon last month, our handyman began demo on the bathroom. Goodbye old shower!
He ran into some issues, like having to pour a new cement post in the foundation because there was nothing holding up corner wall near the tub…
We also discovered all of the original 1940's cast iron plumbing, and decided to replace it throughout the house. It was a good thing we did—yikes!
The old contractors left all the construction debris underneath the house rather than disposing of it, like remnants of the original tile:
Extra time was also spent replacing many of the rotted floor joists, so this baby was taken down completely to the foundation. Here is the view from the door (the toilet used to be below the window):
And looking to the left, where the wall was removed to make room for the new master bath:
Here is the view from inside the bedroom, looking into what will become both bathrooms:
The shower wall, standing from inside the new master bath:
The vanity will sit in this corner:
The bathroom door and closet were framed last week:
The plumbing should be finished soon, then the new subfloor can be installed along with framing to divide the two bathrooms. The progress has been much slower than we anticipated (and costlier due to all the surprises) but that is how renovations go sometimes (most of the time ?) so we are rolling with the punches.
The next bathroom update will be a blog tutorial + timelapse video of one of my favorite easy wall treatments: board and batten. Looking forward to sharing those with you in a few weeks, if all goes well!
Stay tuned for all the details on our new kitchen at the Heights House, coming next week…