Master Bathroom Progress: Heights House
From one bathroom to the next! As in love as I am with our recent guest bathroom makeover, I have to say… I am even more excited about this one! A couple months ago I…
From one bathroom to the next! As in love as I am with our recent guest bathroom makeover, I have to say… I am even more excited about this one!
A couple months ago I shared my vision and detailed plans for this room (along with all the Before photos) but here is a quick refresh…
The footprint is quite small at just 10'x6' (plus a few extra feet for the shower), not quite big enough to stand back and capture it all even with a wide angle lens.
But the 9'4″ ceilings go a long way to help it feel more spacious, and the 4' window lets in a good amount of light.
The vision for this bathroom is elegant, rich and refined, warm and luxurious with attention to detail. I was obsessed with the idea of floor to ceiling marble/stone walls and that became my first design decision.
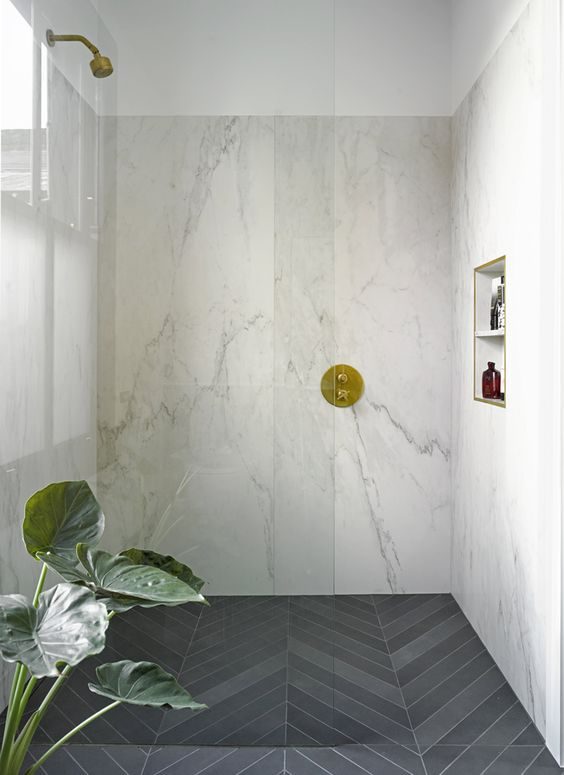
I landed on the Lincoln Super White porcelain panels from Bedrosians' Magnifica line, and ordered four to cover the entire back wall and shower (they offer four unique faces, below)
The slabs are available in 10' tall which were cut down to fit our ceilings, and they come in both 1/4″ and 1/2″ thickness. I ordered the 1/4″ to save on cost since they'd just be attached to a wall (you can also use them as countertops or on any surface—they are memorable!) The cost is certainly more than regular tile but a lot less than standard thickness stone slabs in that size, mine was around $26/sf. It is a splurge, but 100% worth it in my opinion as it is so dramatic and striking in person (bonus: durable and easy to clean, too!)
One important thing to note—since these panels are very thin and very large (read: fragile), they need special installation equipment and are supposed to be installed by someone certified for this type of work to keep the warranty. Bedrosians has a network of these installers and can recommend someone in your area (reach out to @Bedrosianstile on Instagram for any questions, they are particularly responsive and helpful!)
Our slabs arrived a couple weeks ago and I could hardly contain my excitement.
It took several strong guys an evening to carefully load them into the house with this giant contraption:
Installation began the following day, and it was a sight to behold. At one point they did not think they could fit the huge slab through the door and around the tight corner (the slab was 5'x9'4″ and the room is only 6'x10'! By some miracle, it barely squeezed through…
I shared updates live on Instagram as the drama unfolded…
Fortunately, the first two panels went up safely after a full day of work. WHEW.
The following day, Lucas and I were upstairs working on the guest bathroom while the installers were cutting the final two slabs. Then we received the news we'd been dreading… the last slab cracked in half as it was being cut.
Oh, the devastation. Getting a new slab was not genuinely an option because it would take several weeks (we are on a deadline to finish this house and get our final inspections) and we'd likely be responsible for covering the cost which was not in the budget. Our builder assured us that he'd be able to patch the cracked seam to where it would not be visible…
Fortunately, it is in a spot on the inside of the shower where no one but Lucas and I will see it. I am hopeful it can be covered up but I am also not going to be OCD about it. There are bigger problems in life and it is not worth stressing over! (I have had to repeat this to myself almost on a daily basis during this build—you will drive yourself crazy if you do not learn to let go of perfection).
And this is where we focus on what HAS gone right, like these striking handmade diamond tiles (from Bedrosians Paseo line)…
I shared the install of these beauties in my Instagram stories a few weeks ago…
Every bit as well composed in person as I had imagined. These were also a splurge at almost $8/tile, but there is nothing else like it out there (I have looked). I was set on a black diamond floor and nothing else would do!
Since the tile is naturally porous and unsealed, the ivory grout became embedded into the surface and gave it a hazy/discolored look after installation. Cleaning did nothing to remove the haze and I was worried they were ruined, so I reached out to Bedrosians and they recommended this grout restore treatment. You can see the difference in the treated vs untreated tiles:
It took a few hours of scrubbing, but as of last night the tiles are good as new! I also bought this grout sealer which we will be applying tonight to ensure they stay sparkling clean.
Okay, let us get onto this wall treatment. I have done all kinds of molding in my day, but this two-part technique was new to me. The first step, as always, was to mock up the design in Illustrator with the correct dimensions (you can ignore my measurements as they'll probably just confuse you, but this was the template we used…)
This layout was chosen after several iterations, and it was trickier than normal because I had to work around the sconce, outlet and vanity locations. I felt good about the plan though, and headed to Lowe's for the materials. Primed 1×6's were selected for the cross pieces as they are inexpensive, easy to work with and readily available.
For the accent molding, base cap is traditionally used with these installations (all of the baseboards in our house are 1×6's plus base cap molding). When I was browsing Lowe's I came across this PVC base cap, which is moisture/mildew proof designed for exterior applications and well suited for a bathroom. And less than $5/ea—no brainer!
We also grabbed a couple pieces of molding for the ceiling (you can use anything here). The only other materials needed for this project were liquid nails, caulk, paint, and basic tools including a miter saw and nail gun.
The 1×6's were first installed along the bottom and corners, and then we measured out equal spacing for the inside verticals and drew a straight line all the way down using a level.
The trickiest part of this operation is dealing with walls that are not completely flat. Our plumbing had to be relocated at one point and the patched drywall area was not level, so the 1×6 would not sit flat against the wall and there was a large gap at the top. Since this area would be entirely hidden behind the vanity, we decided to cut the bottom of the piece off where the wall started bowing so the visible part could sit flush.
The only other major obstacle was the far right sconce, which was easily remedied by a jigsaw + steady hand:
Once the long pieces were in, the shorter ones went up without a fight.
With most of them we encountered problems getting the edges to line up perfectly flush, due to a combination of neither the wall nor the 1×6 being completely straight all the way through (yep, this happens even with new construction). We had marked the studs out in advance and nailed into them whenever we could, but not every board hit a stud so we could only do so much to pull them to the wall (we also used a decent amount of liquid nails to keep them in place).
After all the 1×6's were in (we also added them just to the top/bottom/edges of the other two walls) it was time to add the base cap. This part is easy—measuring and 45º miter cuts (just make sure your molding is facing the right way on the saw!)
The pieces are somewhat flexible which means they are forgiving and easy to work with.
Liquid nails + a few finish nails is all it takes.
As long as your 1×6's are straight and form 90º angles (which they should if you used a level!) these 45º cuts will line up perfectly each time.
With Lucas measuring/cutting and myself installing, we finished this part in just a couple hours (and basically inside a sauna as it was 90º that day with no breeze and the house has no power/AC yet). If I can do it, so can you! 😉
The PVC base cap was well suited to use along the shower for a nice clean waterproof edge. I much prefer the unfussy look of this to bullnose or pencil liner.
Once all the molding was attached, it was time to start puttying & sanding. This is where we get to fix those uneven 1×6 seams…
This is a critical step because once its painted, these transitions will stand out like a sore thumb.
Mouse sander to the rescue! It takes some time, but the effort is worth it.
The next day I came back to begin caulking. This was easily my least favorite part of the process. It is one thing to caulk 1×6's around a wall, but the base cap adds plenty of extra work. You have to caulk every single edge and intersection of every piece of molding.
The corners and edges are easy, but any curved areas and especially the trench between the 1×6' and base cap requires some expert level caulking to make it smooth.
You have to get just the right amount in there and use just the right amount of pressure and speed and do it all in one continuous pass.
If you are a beginner level caulker going into this, rest assured you will emerge as an expert. It took me over a day to finish.
But I was happy with the results, and ready for paint! Earlier that day the electrician had come to finish the house and installed our sconces…
So striking, right? And affordable too! I partnered with Overstock and shopped for bargains to get almost all the accessories for this bathroom, since most of our budget was put towards tile.
Now it was finally time for the moment I had been waiting for… PAINT!
Accessible Beige is the color we are using on all the trim/doors throughout the house, so it was a natural fit to use here as well. I fell in love with it after using it in ourlaundry room makeover last year, and knew it'd be the well suited calming greige for this space.
I chose an eggshell finish just because It helps to keep matte paint so much, though satin is a more common (durable) choice for a bathroom. I would have been happy with either, to be honest!
Accessible Beige is a dynamic color that reads beige in certain lighting and gray in others. It helps to keep how it changes the mood of room depending on the time of day.
And as of today (the day this is published) we should have our vanities installed with a custom stone countertop! I ordered two of these 42″ vanities from Overstock which were the well suited size for this wall, and we modified the existing top (the new stone will wrap around it):
Another shot of the window wall:
And the door which leads into the walk-in closet (the shower is just to the right):
Just a few more things to do in here, like hang these oval mirrors:
The sinks, sink faucets and shower faucet should be installed by Friday, and we will put the finishing touches on this weekend (as long as there are no hiccups!)
Ahhh we are so close I can taste it! Who else is looking forward to this reveal!? We have a ton of projects we are trying to finish over the next couple weeks between both houses, so I'll squeeze in a photoshoot & reveal post at some point within that time. If you are not following me on Instagram, I have been sharing all the daily updates in my stories so make sure to add me there or on Facebook to keep up with all the fun!
More to come,