Heights House Guest Bathroom
This post is part of a paid collaboration with Lowe's Home Improvement. All opinions are my own. Back to back bathroom design posts means things are genuinely about to…
This post is part of a paid collaboration with Lowe's Home Improvement. All opinions are my own.
Back to back bathroom design posts means things are genuinely about to start kicking into high gear at the Heights House! Last week I shared our plans for the master bathroom, and today I'll dive into the design for the main guest bathroom.
Straight ahead from the top of the staircase, the upstairs guest bathroom serves our two guest bedrooms (on the left) and the bonus room on the right.
It is on the small side, and it is the only bathroom (out of three) with a tub.
My favorite part is the window and roofline. Pretty unique, right? I have got plans to make it even better!
The trickiest part about these small spaces is that they are so hard to photograph. But I'll do my best for ya!
The vision for this space is bold, luxurious and cozy. We are talking rich matte black, glossy white, champagne gold and textured tartan for an unexpected yet classic touch. And did I mention this will all be on a budget?
I am genuinely excited about this design, but it took some time (and plenty of back and forth) to get to this plan. Let us get into the details and my thought process behind it all!
Statement tile
To me, coming up with a design is like creating a new recipe. There are basic rules/ingredients that always work together, but the magic is in the small details/variations made which make it uniquely your own. You do not have to worry about getting it 'just right', as ingredients can be delicious in many different recipes. Remember it is an art, not a science (unless we are talking about baking, that is a whole other story…)
The floor tile was my 'key ingredient', and my starting point for the room. Months ago, I spotted this tartan tile on Instagram and literally got goosebumps—that is how you know you've found a winner.
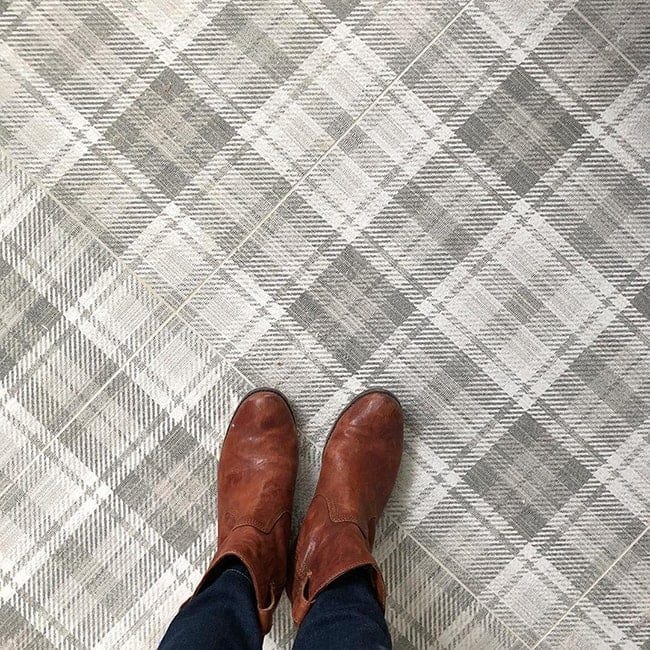
I immediately assigned the tile to the upstairs bathroom and placed the order weeks ago. The only slight hiccup—it is special order from Italy and will not arrive until the end of March. I did not care, I'll wait a lifetime for this tile. Even still, the bathroom show must go on as we need to finish our house ASAP to get our inspections passed and Certificate of Occupancy.
If you love the look of textured tile but do not want to wait for a special order, Lowe's has a few nice options, like these porcelain tiles which come in two different sizes (only $3.59/sf!)
And these 'canvas' porcelain tiles for $3.93/sf:
I do not know about you, but I am loving this textured tile trend! I hardly see anyone using it but I would not be surprised if it caught on and became the next patterned cement tile. Should we all band together and make it happen? I'll go first! 😉
Colors
Color palette is always one of the first things I think about, because it helps define the mood of the space and clarify the direction you want to take the room in.
With just the tile to go off of, I could have taken this room in many different directions. Light and airy, dark and moody, soft and serene or bright and youthful. I have been on a dark and moody kick recently, especially for small spaces like bathrooms. There rest of our house will be white and bright, so I thought the guest bath would be the well suited space to get my dark fix.
Black was the first place my mind went—there is just something about this bold yet timeless color that speaks to me. It makes a room feel luxurious and cozy, and I loved the idea pairing it with a classic pattern like tartan.
To bring warmth to the space, I chose champagne gold for the fixtures, which also represents luxury. And you cannot forget about including a healthy dose of white, which balances out all of the drama and allows your eyes to rest.
Throw in a couple natural accents like wood and woven baskets, and this recipe is set. It is all about having a good variety of ingredients to make a room rich and flavorful.
Vanity
After selecting the floor tile and deciding on my palette, the vanity was the first piece I looked for. I generally try to find the largest/most substantial piece OR the hardest thing to shop for in the room first, since it will be easier to find smaller pieces that play nicely with it afterwards.
Fortunately, I needed a 48″ vanity for this room which is one of the most common sizes, so there were options galore…
One in particular caught my eye right away:
I loved the unfussy design, the functional drawer storage, and the open area on the bottom for woven baskets or towels. And I could not ignore the price at just $949—including the stone top and sink. Hard to beat!
I also loved the fact that it was customizable, so you could choose not only the vanity size, but the base color and the type of stone.
The choice was to stick with the clean look of the white, and opted for the Carrara top (it is a faux marble, which = easier maintenance!) though they do offer a real Carrara marble option.
Verdict is still out on whether or not I'll use the backsplash it comes with (probably not, I think it looks cleaner without) and I am also not very fond of chrome hardware so I'll be switching those out with these oval oil rubbed bronze pulls:
Here is where it pays off to pay attention to detail: I went to Lowe's to look at the vanity in person so I could inspect it before buying (they did not have the 48″ model in stock but they did have a smaller one), and noticed the stock handles are attached with 2 screws. The new handles are only 1 screw which is not a problem (I'll drill new holes) however the new handles are not large enough to hide the screw holes. Instead of looking for new handles, I took this opportunity to look for something I have been wanting to try for a while—backplates!
These instantly make knobs and pulls look more high end and they often have a vintage feel, so I thought it'd be a great way to customize the vanity. I highly recommend upgrading the knobs on stock vanities as an easy/affordable way to make it your own.
I came across these ORB backplates from the same brand (which means they should match) and they do not break the bank at $5.60/piece:
The next (and probably most important) part of customizing the vanity is the faucet. Usually vanities do not come with a faucet (including mine, it is just shown with one in the stock photos), but it is an important way to support the design and style of your bathroom.
From the beginning I had decided on gold/brass hardware which instantly narrowed my options, but quality was another important factor. There are certain things that fall under the less functional/more decorative category like lighting, mirrors, hardware and wall decor where you can skimp on quality for price. At this stage in my life though (and with this house especially) I am more hesitant to cut corners on functional pieces like plumbing fixtures. My goal is to limit the expensive plumber visits and make sure things are done right the first time!
With that said, it was a pretty easy choice for me to land on this Delta Victorian faucet:
What It helps to keep about it: the vintage look, the quality/high ratings, and the champagne gold finish. Delta has an entire line of products in this finish, which I prefer to polished brass and it is one of the main reasons The choice was to stick with this brand (I have used their Trinsic in the past and will be using their Dryden in the master bathroom).
After the vanity situation was worked out, I turned my attention to the walls.
Wall treatment
With tartan floors, a white vanity and a white ceiling, black was the only option in my mind for the wall color. But if you know me, you know I need more in my life than just painted drywall. Normally this means wallpaper or some sort of molding treatment. Wallpaper was nixed right away because I did not want any pattern competing with the floors, so bring on the trim!
I tossed around the usual ideas like shiplap, board & batten, picture frame molding, beadboard, etc. And then… then I found it:

Oh, my. Here is another angle because I know you are glued to the screen…

After picking my jaw up off the floor, it clicked that this wall treatment was exactly what I was looking for. Well, not exactly—I'll be swapping the stained wood for black paint. Yes, those lines you see in my rendering are not representing stripes, but rather thin strips of molding…
Fortunately, Lowe's carries just the right material for this! I roamed my favorite aisle (the molding aisle, of course) and found these 1.5″ strips of wood lattice that should be well suited for the job:
They come in a few different lengths and widths too, but I needed the 10' strips since our ceiling is 9'4″ at the tallest point. I took a bunch of measurements and calculated that I'll need 24 pieces (including a couple extra for mistakes) which comes to around $220 for the entire room—cannot beat that!
This will be a relatively time consuming process I am sure (especially with the funky window/wall angles, and we are covering every inch of the walls minus the shower), but the material is inexpensive and easy to work with. I predict this will pay off in a BIG way. Thank you, Jean Stoffer, for your endless design inspiration.
I mentioned I'll be painting all of the walls black—I have not locked down a specific color yet, but I'll do a whole separate post all about the wall treatment DIY and paint color next month. The ceiling, door/window trim and baseboards will all be white. Looking forward to that post!
One more fun element The aim was to squeeze in… you see that little section of drywall where the wall meets the ceiling?
Well, it is covering something structural but I immediately envisioned an actual beam resting in that spot, so we are going to give it a little makeover! The plan is to attached reclaimed boards to the face, so it looks like a real rustic beam. It'll be a nice little detail and will bring a much needed wood element into the room.
Shower + toilet
A classy room needs a classy toilet, and it does not get much classier than this Kohler…
Truth be told, I saw this toilet on Pinterest years ago and have dreamed about it ever since (in a normal, non-creepy way). I always said that if I ever design a luxurious bathroom, this would be my toilet. It is not the cheapest option at $358, but it is definitely not the priciest either. Let me tell you though—it is something most people do not even think twice about, but you guys, toilets make a difference. It is the forgotten chair in the house yet it gets used the most. Do not forget about your special chair… it deserves love too. P.S. I plan on getting these for all 3 bathrooms.
Now for the shower… this was the most difficult part for me to decide on. I was torn between wanting to do something interesting and unique, and wanting to keep it unfussy to not compete with the floors and walls. If you've been around for enough room reveals, you know I like to take every opportunity to do something I have never done or seen before. In my heart I knew that I had to keep the shower unfussy and white, but I could not bring myself to install basic white subway tile in the shower (not that there is anything wrong with this, it is just been done so many times!)
I also could not spend a fortune on cool textured/shaped tile, and I still wanted something timeless to match the style of the rest of the room. It needed to be unfussy and subdued, with just enough of a unique touch to make it interesting.
Enter these $0.98 3×12″ ceramic tiles:
I spotted them on Lowe's and they immediately piqued my interest. The outlined edge is a neat touch, and I also loved the way they stacked them vertically here:
Luckily they are readily in stock at Lowe's, so I scoped them out in person. Definitely liking what I see.
Even though they are labeled 'subway tile', I think the added detail and stacking them vertically will make this shower stand out from your typical subway tile walls, but it also will not try to steal the attention from the rest of the room. In a couple weeks, I'll do a whole blog post and video about our installation with the Before + After—stay tuned!
Mirror, lighting + accessories
With the big decisions out of the way, it was on to the funnest part—accessories! Unless I find and fall in love with something early on (or need a very specific size), I usually save this part for last since there is so many great options out there.
I had to have the lighting locations planned out months ago during the electric rough-in stage, so I opted for two sconces—you can see the boxes below:
My original idea was to have a round mirror flanked by two taller sconces, like this:
I found this round gold 28″ mirror for a steal at $50, and these elegant brass lantern-style sconces (tip: when shopping for bathroom lighting, search for “wall sconces” instead of “vanity lights”—it'll open up a lot more (and nicer) options!)
I did not mind that setup, but I thought the mirror was on the small side, and there was a whole lot of brass/gold tones going on. Thanks to the magic of Photoshop, I continued my search and and eventually settled on the winning combo: a 'champagne silver' arched mirror, and warm brass sconces:
What It helps to keep about the mirror: the arched shape, the light silver color to break up all of the gold tones, it is the well suited size and it is only $75! Best deal I have seen on a mirror with this style in a long time (maybe ever?)
What It helps to keep about the sconces: I have actually had these pinned for months, and it did not click right away to use these as vanity lights. It helps to keep that they are unexpected, the unique shape, and the warm brass tone that I think will go nicely with the champagne gold faucet. And $112 is not too bad on the wallet…
For the shower faucet, I went with another Delta model in champagne gold (for the same reasons listed earlier) and also to keep the room finishes cohesive. The Linden is another one of their more affordable trims:
It helps to keep the functionality of the pull-out sprayer, and think it will come in handy for future baby baths 🙂
I also ordered 4 of these champagne gold hooks—remember how nicely they worked out in our laundry room? Favorite hooks under $6!
I'll be using a champagne gold (or similar toned warm brass) for the towel and toilet paper holders, just have not found those yet. I also plan to add framed artwork of some sort, which will probably be a last minute decision after the room is closer to being finished.
Alright, guys—I think that just about covers it. I hope that by sharing all of these details and my thought process behind the design, you will feel more confident about making design decisions for your next remodel. There genuinely is no one “right” way to approach design, and it gets easier (and more fun) with every room!
Any questions/comments, please leave them in the comments below, or head over to my Instagram and Facebook where I am most active. This week will be another double-post—we have got another vlog update coming at you in a couple days so check back then!