Thrift Store Bookcase/Nightstand Makeover Tutorial
I did not expect another DIY furniture project in my future for a while, but when Wayfair asked me try out their peel and stick wallpaper on a bookcase, I went into all…
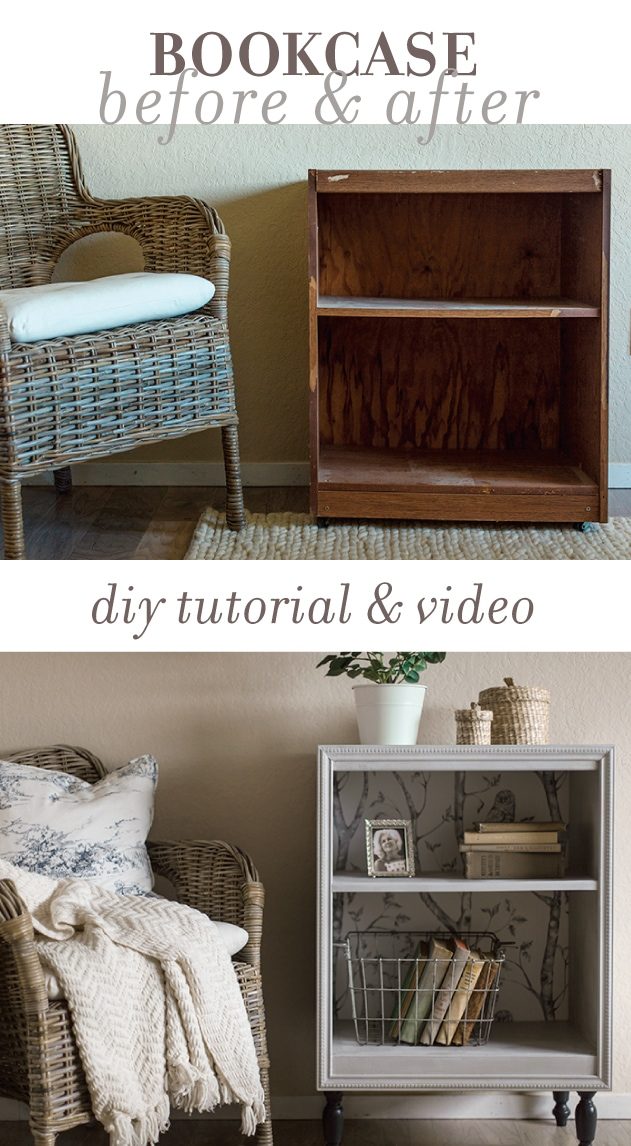
I did not expect another DIY furniture project in my future for a while, but when Wayfair asked me try out their peel and stick wallpaper on a bookcase, I went into all out makeover mode.
Today, Wayfair released my second video for their new Inspiration Insiders series, and this week I am taking you through the process of transforming an old bookcase using trim, paint and wallpaper. Click on the image below to watch, and if the video is helpful it would mean the world to me if you gave it a thumbs up or left a comment!
For those who prefer written content, I'll be elaborating a bit more on the steps below.
After finding out my assignment called for a bookcase and realizing I did not own one, I did what any other budget-minded woman on a mission would do—thrift store! Habitat for Humanity Restore, to be exact. I knew they'd have something there.
And they delivered.
Ah, the unmistakable feeling of potential at first sight.
Okay, so the $5 price tag is genuinely what sold me but I knew it could make for a pretty dramatic “After” with a few magic touches.
I drug the poor mess of a thing into my garage, cleaned it off and evaluated my options for beautification.
There were major blemishes that had to be addressed, like the chunks of fake wood missing and peeling veneer. I remembered back to one of my personal favorite makeovers to date—my “Ikea to vintage” mirror project—and knew I could use trim again to cover the front, add detail & interest and make it feel more substantial.
First, I removed the wood back that was nailed on:
The top of the bookcase was uneven and damaged, so I found a scrap piece of smooth 1/4″ plywood, measured and cut it to size:
The bottom face piece was uneven with the sides, so I cut another small scrap to fit and nailed it in place:
Part 1, done.
I found this 1.25″ vintage style wood trim at Lowe's and decided the size, style and price were right so I grabbed two pieces to frame the entire front perimeter of the bookcase.
This involved a bit of measuring and mitering:
A few finish nails later…
These $3 wood legs from Lowe's also caught my eye, and I thought they'd be a nice touch and great way to create additional height.
After a scrap piece of trim was added to the center shelf and the legs installed, the nail holes were filled and a bit of caulk added to the mitered trim seams.
Then it was time for paint! I pulled out my stash of Maison Blanche and settled on one of my favorites—White Pepper french lime paint:
I found that a smooth roller for the flat surfaces and a short handled brush for the trim details/corners worked the best.
This paint is different than most in that it goes on dark and lightens when dry. It is a muddy gray in the can but finishes to a soft greyish white, and the finish is thick and rich like velvet. Oh, and it covers over the veneer with zero prep work or problems unlike traditional latex paint.
The legs were painted black for contrast and I let the piece dry overnight.
To protect the surface and give it a subtle aged/patina look, I finished it off with a coat of lime wax:
See the difference?
With the wax curing, it was time to focus on the back. I chose this pretty grey & white woodland design from Wayfair:
I had planned on reusing the original wood back piece, but being a first time wallpaper-er, quickly learned that you need a completely smooth surface.
So, after another trip to Lowe's for some smooth hardboard, I was able to successfully peel and stick my wallpaper into place (refer to the video for a demonstration)
For reference, this is how it looks next to my first attempt using rough wood. Not the best idea… unless you prefer a textured look, I suppose.
The last and final step was to nail my new backing into place:
Let us revisit the before, in all its thrift store glory…
And here she is now, after a little TLC…
Who'd have guessed this was the same bookcase?
For an inexpensive weekend project, I cannot complain with the results! I like how it is versatile and can easily be used as a side table or nightstand as well. So many possibilities. What do you think?
Next week I'll be sharing a summer patio makeover, plus all the details of my first wine party hosting experience, including another video and free printables. I am particularly excited about this one!
In the meantime, you can check in with me as I tackle the never ending list of projects every day on snapchat (@jennasuedesign), instagram and facebook. See you back here in a couple days with a new vlog!