Riverside Retreat Kitchen Plans
The Riverside Retreat kitchen renovation has been a long time coming, but we have finally pulled the trigger on Phase 1 and today I am sharing all the plans for this…
The Riverside Retreat kitchen renovation has been a long time coming, but we have finally pulled the trigger on Phase 1 and today I am sharing all the plans for this budget conscious makeover!
If you are new to the blog, we bought/moved into this house last summer with the goal of renovating it (on a budget) to become a vacation rental. Today it is about halfway completed, and now that we are no longer living there, we have finally started taking on the bigger projects like the kitchen and bathrooms. Make sure to look at the Before Tour here along with our design plans (you can also watch the video tour here).
The kitchen does not look too horrible in the photos, but the cheap laminate cabinets were falling apart (and rotting away from exposed plumbing and water damage on the back wall).
It is a decent sized room (13'5″ square) but floor plan of the house does not allow us to knock down any walls to open it up (it borders a laundry room, bedroom and a downstairs bonus room).
Door to the laundry room on the left, and main entrance from the dining room on the right (a bedroom is behind the wall in the center and cannot be removed):
The one thing this kitchen does have going for it is 9' ceilings, which goes a long way to make it feel more open.
Last September we replaced the tile floors with new Pergo laminate, but did not touch anything else. I do not recommend staying in a house during weeks of tile demolition—we will never forget living through The Great Dustpression of 2018.
I have had a year to think about the design for this space, and have finally come up with a plan I feel good about. The two biggest considerations for me were 1) price point and 2) overall look/feel.
Since this is an investment property and we have a limited budget, I had to be thoughtful about where to best allocate those dollars and that meant no splurging on high end items. With that said, a unique and eye-catching design is critical to stand out in the vacation rental market, so this cannot be a generic white kitchen. I had to find creative and inexpensive ways to make it feel custom but still classic, and in line with the overall theme of the BnB: tropical, earthy, boho, mediterranean resort style with lots of deep greens, natural textures, wood tones and bold patterns.
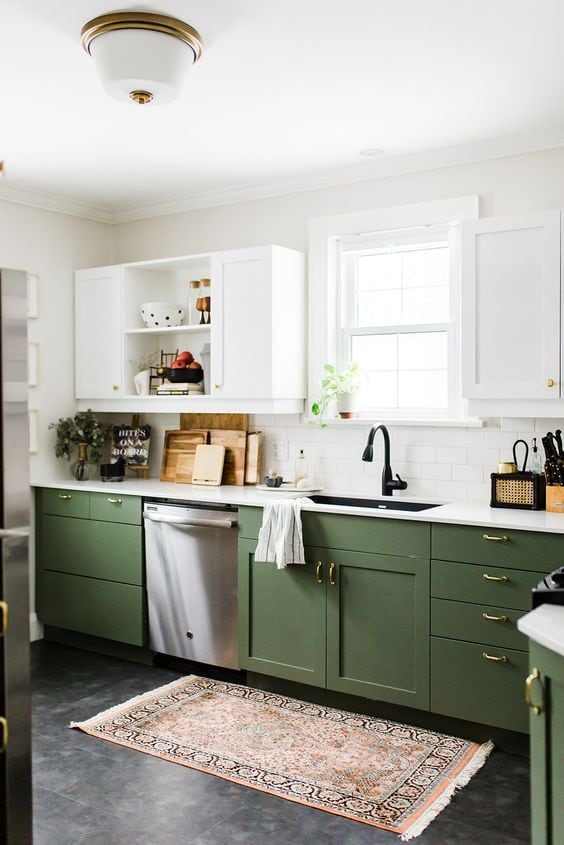
I looked to Pinterest for inspiration, and a few recurring ideas stood out. Love the green used here, the vintage rug and how light and open the room feels with white uppers:
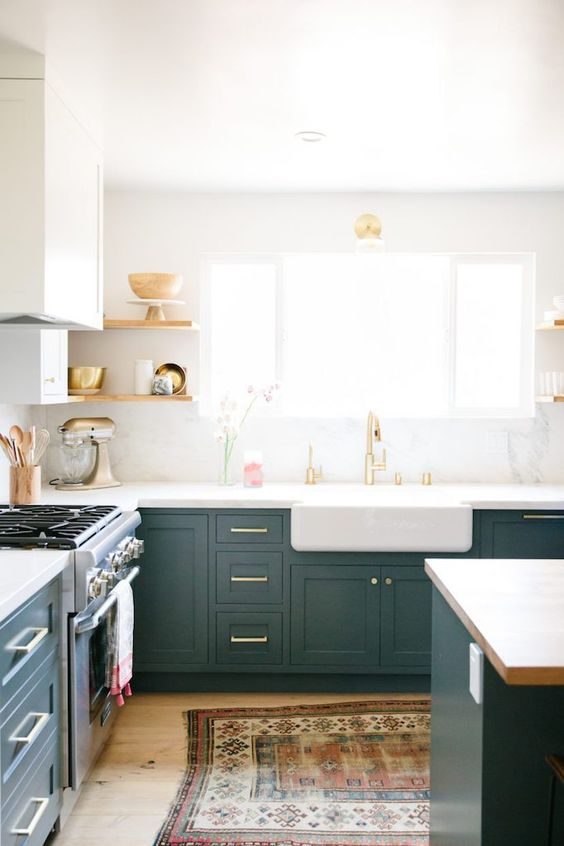
These cabinets are more teal but another great example of how much taller a room feels with open shelving/white on the top half. Love the gold accents and rug too:
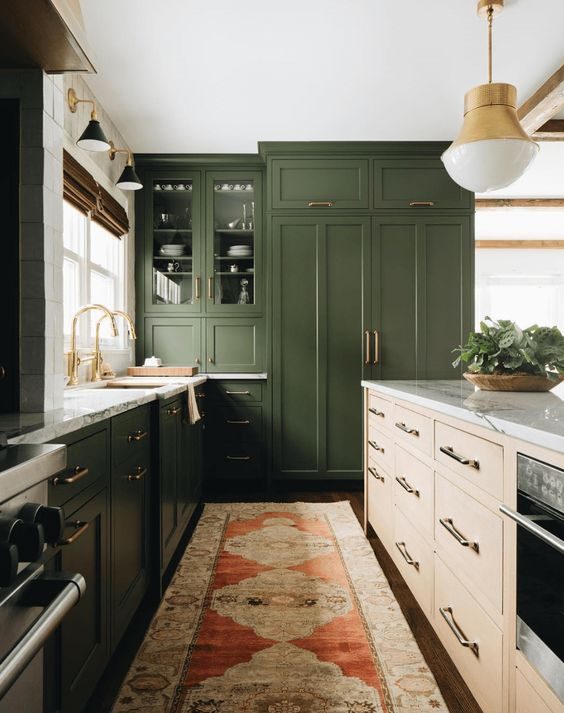
Talk about going all in on color! This shade of earthy green is the closest to what I am looking for, and it looks killer next to all the brass, natural wood and warm tones.
These cabinets are more of a sage green, but yet another example of green lowers paired with white on top. Such a refreshing combo!

With my design direction established, I spent plenty of time searching out products that fit the style—and most importantly, the budget. Here is what I came up with:
1 / 2 / 3 / 4 / 5 / 6 / 7 / 8 / 9 / 10
A quick breakdown of the sources:
1. Cabinets
Cabinets are the foundation of a kitchen and typically the biggest portion of the budget, so I tend to choose them first when coming up with a design. I knew I wanted green lowers, but was not able to source anything in stock in the right color. I quickly realized I would have to use a custom color, and shopped around for unfinished cabinets I could paint myself, but even those options fell short (the wrong style, too expensive, not easily customizable/confusing ordering process).
Eventually I landed on IKEA, which is generally accepted as the most economical customized route. I have used their cabinets to build a DIY pantry, bench seating and bar area, but this would be my first time using them for an entire kitchen. Those were all positive experiences so I felt confident going all in this time. One of the biggest selling points, for me, was the ability to use their 3D planner to visualize the design before ordering.
After going through all of the options, I settled on the Torhamn style for the main cabinets/lowers, and Axstad for the white uppers.
I chose the Torhamn line because they are wood and can be sanded/painted, they are a classic shaker style and one of the most affordable door styles Ikea offers (picture all the wood cabinets in these renderings painted green—exact color still TBD!)
We will have to do some modifications/custom work like adding filler pieces, building a surround for the fridge, a custom range hood, crown molding and trim. Even still, we were able to customize quite a bit with the help of an Ikea associate. I would highly recommend going over your plans with them before ordering, as they can make suggestions you did not even know were possible. Like our upper doors…
The 3D planner will not let you mix and match door sizes with cabinet frames (we used 30″ plus 20″ boxes for the uppers) and the associate was able to swap the smaller doors out for individual 50″ doors. We were not able to preview the taller doors in the rendering, but this will be more functional and look cleaner (and saved us a little $).
We will be adding floating shelves on either side of the window which will help the kitchen feel more open, make it easier for guests, and save $ on cabinets. I did opt to spend a little more on their Spolad built-in dishwasher with a matching cabinet panel on the front—so worth a few hundred more to have a nice clean row of uninterrupted cabinets!
We ordered everything last week during their kitchen sale (10% off) and spent $5853 total, including our countertops and the dishwasher. It'll end up costing more after all of the modifications we will need to add, but I would consider around $5k (for the cabinets) in a standard sized kitchen to be a pretty sweet deal.
2. Backsplash
I knew The aim was to use Bedrosians Cloe tile since it first launched last fall. I have had samples sitting in a box for months and decided the white colorway would be well suited for this space.
It is a classic subway style shape but the color variation, sheen and texture add a ton of dimension and interest. Now the only question is… stacked or staggered?
3 & 4. Pulls & knobs
I was almost ready to pull the trigger on these knobs and pulls for our Heights House kitchen and ended up nixing those plans since there was no matching appliance pull. But that means I can finally use them now!
I found them on Lowe's and love the fact that the pulls come in 4″, 5″ and 6″ lengths with matching knobs.
The best part is, they range from just $4-$8. Done and done!
5. Pendant light
We will be adding a pendant light above the sink, and this schoolhouse style is timeless, classic and budget-friendly (also on sale until tomorrow!)
6. Countertops
This was one of the more difficult decisions because I had envisioned white/marble-like counters in the original plan. I thought Ikea's Eckbacken would be well suited (only $80/slab!) but did not love the way it looked in person and was concerned with the quality over time—definitely too good to be true at that price.
I could not justify spending thousands on real stone, so that left us with the tried and true budget-friendly option—butcher block:
Ikea carries a few different styles/species, and I chose the Karlby as it was the closest match to our floors.
Even though it was not my first choice, I have come around to the idea of wood—especially given the fact that our countertops only cost around $300 total. You genuinely cannot beat that!
7. Faucet
A satin brass/gold finish similar to our cabinet hardware was the most important factor for me here, and those options are surprisingly limited. I have been using fixtures in Delta's champagne bronze line for years (reputable brand + well composed finish), and found a unfussy/relatively affordable faucet that fit the bill:
8. Sink
It helps to keep a good farmhouse sink—in fact I have used them in every kitchen remodel since 2013—but this time The choice was to mix things up and go with an undermount. No particular reason other than to try something new and save a few bucks. This unfussy white 33″ undermount sink is only $163 and has good ratings, so we will give it a shot!
9 & 10. Fridge & range
This was another decision I researched heavily and went back and forth on a LOT. I plan to write a dedicated blog post on the non-stainless steel appliance options I found and lay out all the pros/cons of each, so I will not get into those details just yet.
Ultimately, I decided on Whirlpool's sunset bronze line, using this counter-depth fridge:
And coordinating Smart electric range:
Price point was the biggest determining factor, and they have popped up on sale twice in the past couple months (15% off right now until 8/7!) We will not be ready to order for a while, so I am hoping to wait and snag them on sale again a couple months down the line.
I think that covers everything! I am on the hunt for a vintage (or vintage-style) rug but that will come later, and I am still on the fence about adding an island. Since it will be a vacation rental there does not need to be a ton of cabinet storage for food/pantry items, just the basic essentials. Demo began last month but we have switched our focus to other projects, so we are still working on getting contractors lined up for the work.
The plumbing and electric need to be redone first, and we will be hiring out the vast majority since we will be busy with a newborn starting in a few weeks—although we DID buy a paint sprayer and plan to DIY painting the cabinets.
The only thing we have purchased so far are the cabinets, counters and dishwasher, and this will not be a particularly quick renovation so everything else in the design plan is subject to change! You never know what may pop up in the next couple months…
I'll be sharing updates on Instagram if you want to follow along with the renovation, and I'll also post periodic updates here on the blog to show the progress. In the meantime, we have got a new bathroom that is only a couple weeks away from being finished—more on that next week! Exciting times at the Riverside Retreat…